....... an exquisite boutique for that something special


Tuesday, November 22, 2011

Mini Wreath Tutorial

This wreath is made from a small poly wreath
The flower arrangement is made from felt roses and leaves.

Strips are cut 2" wide.
Glue the fabric on the back of the wreath and wind around
and

around until the poly wreath is covered. I leaved the edges frayed.
I then added some braid - ric rac and wound that around too

I then made some felt roses from my tutorials

Felt Rose Tutorial HERE
and Folded Rose Tutorial HERE

I also made a tiny rolled rose. This is made starting the same way as the folded rose...
roll it and then fold it back when you have made it the desired size. Stitch.

The mini rolled felt rose is the small pale pink rose..

A closer look at the rolled rose
A closer look at the folded rose.
I thought it was a great idea to make these out of felt. Ive never thought of this idea until yesterday.


Any questions dont hesitate to email me.


Friday, November 18, 2011

Cake Pops and......

Well Im on a creative roll at the moment and I have to 'strike as the iron's hot' so the saying goes
I was so excited about the inspiration I got yesterday with these little Santa Sacks I had to make some more.
They are all made from felt and I have used Tilda fabrics and braids

White 
Pink... and the red one I made yesterday of course...
I am a lover of red, white and pink together, hence the reason these are all in those colours.
Im off to buy some larger felt pieces today to make some more.

The Tutorial for the Felt Santa Sacks is in the below post.. or go to the sidebar and click on the photo.


Also I love cake decorating.. if you follow me on Pinterest you will see this.
I just love decorating for parties and making things extra special.
I had to have a go at these Cake Pops.

A White Christmas Tree

and my favorite Christmas Puds... I just love these cuties...


Have a great weekend


Thursday, November 17, 2011

Felt Santa Sack Tutorial

I have been in my sewing room today trying to find inspiration for christmas gifts.
I was ramaging through my box of felt and came up with an idea for a santa sack. 
So while I was sewing it up I took photos so I could give you the following tutorial.

Decide on the size of the bag which you would like to make by folding your felt in half. Make sure the length is long enough for you to turn the top over.

Sewing with right sides together
Fold the felt making sure the seam is in the middle.. this is the back of the bag

Sew across the bottom of the bag

Fold the bottom corner of the bag as pictured.. this is the inside seam at the bottom. Do this to both corners

As picture... the corners are sewn up

\
This is what the bottom of the sack looks like when folded out right.

Sew some braid around the inside of the sack. So when it is turned over it shows on the right side.
I used some Tilda Christmas Fabric to make the yoyo.. Tilda heart and Tilda braid for the cuff of the sack

Your sack is finished

I hope you make some of these .. they are QUICK AND EASY... thats my motto!..

Add some stitichery to the front.. I promise these are coming.
 I have drawn up some cute gingerbread houses.

Also

I have started a BOM I purchased last year from The Fat Quarter Shop
Block ONE completed! LOL  finally


Hugs to all


Thursday, November 10, 2011

Some of the Sew Along Dolls


 I have received two emails from ladies that participated in the Sew Along Tilda Doll.
The above photo is of Wendys doll.
I just love the fabrics she has chosen. Also, Wendy has made a different dress for her angel. This dress is in the same book.
A full length photo... isnt she lovely.

And  Anita from Holland took part too.
This is her Tilda Angel.
Dont you just love those quilts in the background... look at the stitchery!! 

I am waiting on photos to be emailed from the other participants. 

Thanks to those who took part.
It was alot of fun.

I am working on some free stitchery patterns for Christmas. Will have them up soon.

Hugs to all


Tuesday, November 1, 2011

Tilda Sew Along Part 5

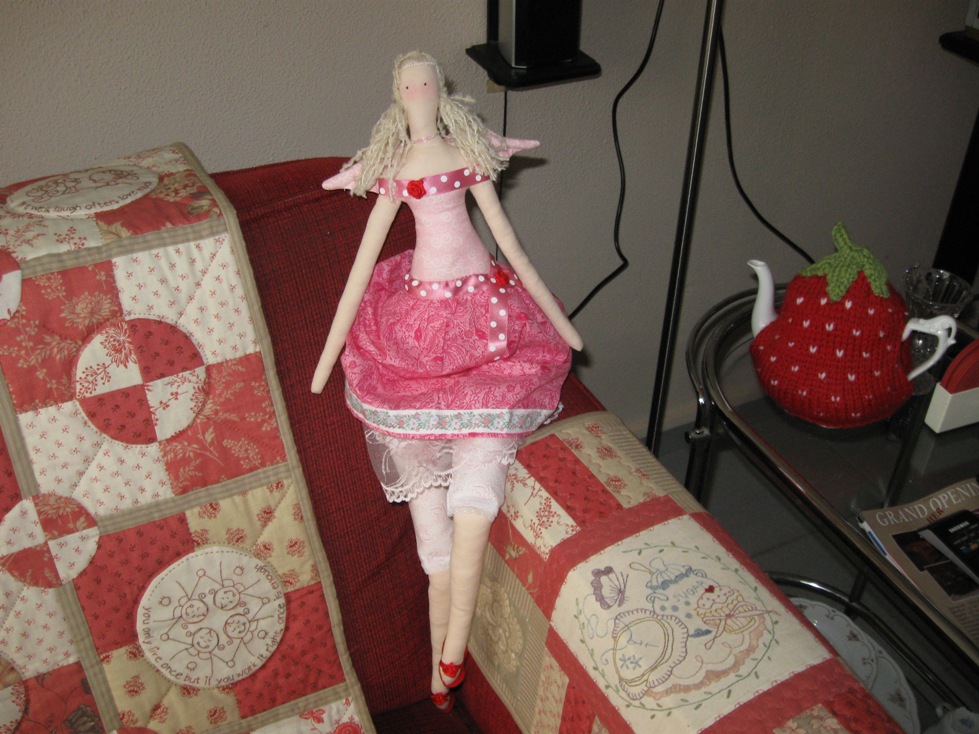
Well ladies... my angel is finished!! She is adorable in my eyes! 

Below is the final stage of the Sew Along. 

Sew the two layers of fabric together to form a tube.
Fold over the raw edge and do a gather stitch on your machine.


Gather up

 Sew the pantaloons
Right sides together to make them look like the photo above

Sew the inside seam

Put them on your doll.
Fold over top edge and pin down.
Hand sew them to the doll so they do not come off

Put skirt on your doll
Gather in as much as you can
Pin to the doll
Hand sew the skirt to the doll

Trace wings onto the fabric


Sew through the double thickness leaving the largest round edge
of the wing open


Turn in the right way
Stuff slightly then sew the lines as shown above

Turn the open seam inside the wing
I handstitched them onto the back of the angel gathering them in.
I liked the finished look this gave.. but it is up to you if you want to finish the wings this way

The back of my angel

Now to embellish.
I LOVE embellishing and finishing the things I create.


I made here some little shoes.
These are made with felt on the sole of her foot and a ribbon rose for the top.

Click HERE to take a look at another Tilda doll I made. This gives more of an idea of how to make them. They are very simple and effective.

I added a rosebud to the top right of her dress and off course some ribbon and the crown. I purchased the crown from Puddlecrafts in the UK. Click HERE to visit their website

A closer look


I have really enjoyed putting this Sew Along together.. 
Thank you for taking part.
I would LOVE to see some photos. Please email them to me so I can show them on my blog.
I hope you enjoyed it and have learnt something.

I hope to do another in the future... Maybe not a doll but something else

Have a great week


Related Posts Plugin for WordPress, Blogger...